WEEK 11
 I’ve started making a blanket and wanted to see what other kind of equipment I would need to finish my blanket without the sewing machine.
- Rotary Cutter – this tool is like a pizza cutter for fabric. The blades are very sharp and cut fabric quickly and accurately. There are many different sizes. I use the medium-sized cutter most and recommend this one for any beginners. My favorite is the Olfa Splash.
- A Self-healing Cutting Mat – allows you to use the rotary cutter for cutting fabric. A printed ruler-grid can also help with measuring fabric pieces. Mats come in many different sizes, but an 18″ x 24″ mat is a good size to start with.
- Scissors – sharp sewing scissors are helpful however, most quilt projects are cut mostly with a rotary cutter so fancy, expensive scissors aren’t necessary. (I love these Elan scissors – inexpensive, but stay sharp.) Do try to keep a pair of scissors purely for cutting fabric/thread so they won’t dull as quickly cutting paper.
- Seam Ripper – no shame here! Even the best of quilters/seamstresses stand by their seam ripper. I have at least 4 located strategically throughout the house because I use them so often. Any seam ripper will work, but my favorite is this Clover seam ripper.
- Fabric – we’ll talk about this more in the future, but 100% Cotton is best. If you’re looking for a variety of good places to start – any of the sponsor buttons on my right sidebar are links to great online shops. I’d recommend any of them.
- Thread – again, use 100% Cotton thread for quilting. Some thread is better than others. Cheaper thread will break easier and could create a lint farm in your machine. I don’t buy the most expensive thread, but I don’t buy the cheapest either. Because I use so much thread, I started buying in bulk – hence the big cone in the top of the picture. (My favorite is Aurifil 50 wt.) One neutral color works well on most piecing projects – cream, tan or gray.
- Pins – I like the longer straight pins with plastic heads, or even better, glass heads. They’re much easier to grab while working and to find when I drop them into the carpet. Safety pins (not pictured) also come in handy in the finishing stages later on.
WEEK 10
 This week I have looked into monogramming the blanket I want to make. I want to be able to do a monogram in the middle of the blanket, but i am afraid it won’t look good if it is too small.
Materials needed:
- 1 yard of adorable flannel patterned material (can be made into swaddle blanket if you give up!)
- 1 yard of soft, fuzzy baby minkie material
- 1 foot of soft wide-wale corderoy in complementary color (for the circle)
- 1 foot of soft-ish black denim or felt (for the initial)
- Stitch-witchery or other iron-on adhesive
- Enough quality thread for sewing it up
- Patience, tenacity, a working sewing machine
Steps:
1. Print a template letter. Use Word to make a super huge lowercase letter in a serif font until you’re happy. Print and cut the template. Cut out the letter on the black material exactly.
2. Cut out pieces. I traced a dinner plate to get my circle round and of a good size. I cut my letter based on the template plus a second shadow letter in a different color (optional). I cut squares as big as I could evenly get them. Hey, I told you measuring wasn’t my strength.
3. Attach the letter and circle. Use iron-on adhesive to attache the letter(s) to the circle. Run it through the sewing machine to make it extra secure.
4. Sew the circle to the flannel. Attach the circle around the edges to the flannel material. You’re almost done.
5. Sew the front to the back of the blanket together. Lay out the two squares of fabric so the right-side-outs are facing each other. Pin it so it doesn’t wiggle. Stitch around the perimeter 3 1/2 sides. Squish the whole blanket together and force it through the hole so you can see the blanket right-side-out. Tuck in the ragged edges and stitch the rest together.
WEEK 9

This week I have looked for some patterns to put on the quilt I have planned to make. I looked on line a bit to find one I really liked, but I also have to figure out how to put the patterns on the quilt.
Materials:
- Cotton or flannel fabric, 2 pieces of 32×40 inches
- Batting, 32×40 inches
- Bias tape, 2 packs (3 yd each)
- Fabric scraps for triangles (21 total)
- Bye Baby Bunting Triangle template (optional)
- Sewing machine, thread, & straight pins
- Double-sided fusible webbing (Wonder Under)
- Iron
Instructions:
- It’s important that you wash and iron all your fabrics first. Cotton and flannel can shrink in the wash, so you might regret it if you don’t.
- You can use a ruler to measure out your triangles, or you can print my triangle template to use as a guide. Because I’m working with small scraps, I can get the most out of my fabric by cutting my triangles individually. Cut 21 triangles.
- Once your triangles are cut, place them on the rough side of a sheet of double-sided fusible webbing. Iron them well and allow to cool. Peel off the paper backing. The underside of the fabric should feel waxy. If it’s fuzzy, you need to iron longer before removing the paper. Separate the triangles.
- Lay out three rows of triangles in a pleasing pattern. Lightly press the iron on each triangle to tack in place. Then, take it to your ironing board, and iron firmly in place, making sure to get each point.
- Now we’ll layer our fabrics. We’re going to sew directly on top of our quilt , so there will be no need to tie it. Put the backing on bottom, then batting, then the bunting piece.
- Pin around the perimeter of the quilt, and add a few pins in the middle. This will keep the layers from sliding while sewing.
- Start with the middle row, and use a zig zag stitch to sew along the top of your triangles, connecting them in one long row. Then, sew around the edges of each triangle, turning your fabric to follow the shapes.
- You’ll need two packages of bias tape. It’s possible to make your own, but we’re keeping things simple.
To use the tape, unfold one half, and pin the unfolded edge along the top of your fabric as shown. For the long sides, you can trim the end of the tape to fit, and sew in place. For the short sides, you want to leave 3 inches of excess tape at each end so we can make corners with it.
- Make sure your thread matches your tape. Use a straight stitch and sew in place by stitching in the ditch of the first fold line. Remove the pins. Now you’ll fold the bias tape up and over the edge of your quilt. Sew in place close to the inner edge of the bias tape.
- You should have some excess tape at the ends. Fold downward and line up the edge of the excess tape with the tape that’s sewn down. Adjust the the seam at the corner so that it’s at a nice angle. Sew along the inner edge, lining up your seam with the seam you sewed previously. Fold the raw edge under and sew.
WEEK 8
This week i have focused on all of the places I can donate blankets to, If i were to actually want to continue making them after this project.
Blankets can be donated to homeless shelters, local churches and charities that have a clothing donation program, victims of domestic violence shelters, and animal shelters.
Make sure the blankets are freshly washed and placed in suitable containers such as plastic garbage bags to keep them from becoming dirty. You may need to call to find out where a suitable drop off point is too.
Domestic abuse shelters may not give out their addresses, but they can arrange a meeting point or drop off for donations at a safe place such as a church. You can also call the homeless shelter and arrange a time for a drop off that is convenient for both parties.
If your blankets are somewhat threadbare, they can still be donated to animal shelters. The blankets can be used for cleaning, bedding and keeping animals warm. What you can’t use, someone else may be able to! And what better time of the year than the cold, winter season when shelters are already operating at their peak capacities?
I have also found something called “Project Linus.” It is a charity specifically made for donating blankets that you do not use anymore or you have made. They have had 5,850,380 blankets donated since 1995. Project Linus National Headquarters is located in Bloomington, Illinois. National President Carol Babbitt and Vice President Mary Balagna direct and orchestrate the activities of Project Linus chapters located across the United States. Both have been involved with the organization since late 1998, as chapter coordinators and now as directors and officers. They also maintain a very busy Central Illinois chapter, donating an average of 350 blankets every month to local children. With chapters in all 50 states, Project Linus continues to grow. Blankets are collected locally and distributed to children in hospitals, shelters, social service agencies, or anywhere that a child might be in need of a big hug.
WEEK 7

This week I tried to learn how to English Paper Piecing. It was hard at first, but after trying it a few times it became easier. English Paper Piecing is a hand stitching technique deeply rooted in the history of sewing. The technique uses paper templates to stabilize fabric and ensure accuracy when piecing complex angles together. The shapes and templates can really be anything you can dream of, although straight lines are easier to handle. English Paper Piecing (EPP) is a traditional method of sewing that can be traced as far back as the late 1700’s in the US history books. Not only did the Pioneer Woman use this technique to create much needed bedding for the long journey ahead but they helped document the story of these times. You see, since paper was hard to come by, the woman would draw their templates on old letters, newspaper clippings and even torn catalog pages. Sometimes, the templates were left in the quilts as they were thought to provide an extra layer of insulation against the cold.
Some of the materials you will need are:
- fabric scraps
- paper (I suggest freezer paper)
- sewing needle & thread
Basic Instructions:
- Cut your hexagon paper template to the finished size. This will serve as a sew guide and support the shape.
- Cut fabric 1/4” larger than paper template. This extra 1/4” is your seam allowance.
- Place paper template onto the wrong side of fabric.
- Fold over two sides of hexagon and stitch the seam allowance overlap with needle and thread. Repeat the process all around hexagon. Traditionally baste stitching is through all layers, including the paper.
- Join hexagons together with a simple whip stitch, working from one side to the other. Keep stitches small and close together for best outlook.
- Continue to stitch shapes together. After shapes are secure on all sides the foundation paper and basting stitches can be removed.
WEEK 5
This week I decided to look up the best brands of fabric and thread for the best prices, and where to find them at. So far I’ve looked at the ones from Hobby Lobby, Michael’s, and WalMart . At Hobby Lobby you can buy a yard of fabric ranging from one dollar and thirty nine cents to fifteen dollars depending on the type of texture you want. At Michael’s you can buy a yard of fabric for one dollar and fifty cents to ten dollars and thirty five cents. Apparently you can even purchase hog hair to sew with as well, which just seems kind of gross and itchy to me. Wal Mart sells just about any kind of sewing fabric by the yard such as flannel, cotton, fleece, and very ugly patterned fabric. The prices range from four dollars and thirty nine cents, to ten dollars and ninety seven cents.
When I found all of the prices I wrote all of them down and then compared everything. I asked myself “Would I rather have cheap fabric that might make a decent blankets, or would I rather have a more expensive fabric and It last longer?” So I have decided to go with the fabric from Hobby Lobby, simply because some of it is cheap and seems durable but also they have more expensive fabric that I could see lasting for a long period of time in the future. I’ve also found some other good stores that sell fabric that aren’t around here that if i really wanted it, I would have to order it and it be much more expensive.
Here are some stores I found online that are apparently very good:
http://www.heytherehome.com/best-places-to-buy-fabric-online/
Fabric.com
The first time I ever bought fabric online was from Fabric.com and I was not disappointed. What I love most is the free shipping when you spend $35 or more which, for a fabric addict like myself is not at all hard to do. They have all types of fabric but I especially love their home decor fabrics. I’ve used home decor fabrics from Fabric.com on projects like my slip covered ottoman, my reupholstered dining chairs, and in my little mister’s nursery.
They have their fabrics categorized by designer so if you know of a certain fabric maker that you like, you can browse that way. Or if you are looking for a certain color you can search by color. I also love that they suggest coordinating fabrics, but I have to admit sometimes they are a little too matchy matchy for me.
If you are just getting acquainted with Fabric.com check out some of my favorite designers there: Michael Miller,and Premier Prints.
Online Fabric Store
Online Fabric Store is another fabulous resource for fabric. It is so easy to find really great prints in this online store and they carry one of my favorite fabric lines, HGTV! They also have free shipping when you spend $50, but keep your eyes peeled because they often have free shipping days and coupon codes noted right at the top of their site.
I also love that they carry a lot of supplies like grommet tape and upholstery supplies that I need for some of my home decor projects like my DIY Grommet Top Curtains.
West Elm
This is one that very few people know about but it’s true. You can buy fabric by the yard from West Elm! I discovered this awhile back when I made over this vintage chair. I had the dark grey herringbone fabric in mind for my project but couldn’t find it anywhere. It was by some happy accident that I discovered that I could buy the exact fabric I was thinking of by the yard and do the chair myself! Hot Dog!!!
They don’t offer every single one of their fabrics by the yard, but they are a great place to go when you need upholstery fabric because their furniture and the fabrics they use on them are high quality so you can get that same quality for your own project. They also have some of their popular prints available so you can sew up your own throw pillows or make drapes!
One more thing to note about West Elm. I have more than once used their shower curtains for projects because they come in some great prints and they are a perfect weight for home decor projects like pillows and drapes. A total cheater, I know. But when this girl loves a print, I make it work! Want to see their shower curtains in action? Check out my DIY Grommet Top Curtains.
Spoonflower.com
Be careful with this one. It can be addicting! Consider yourself warned. Spoonflower is unlike any other fabric resource because the fabrics are designed by individual designers, not big brand names. Think of Spoonflower like etsy, but for fabric. It is pretty much a collection of art in fabric form and you can search by color or by theme which is really fun. Back when I was doing the little mister’s nursery I would search themes like “typography” or “bicycles” and got so many fun ideas for his bedroom.
You may remember the DIY Duvet Cover that I made for the Grand kid’s room over at my mom’s house. That duvet cover was a huge hit and I got so many questions about the teal watercolor chevron fabric that I got from Spoonflower. I’ll admit the prices on Spoonflower are a bit higher than the other fabric resources I have listed here, but you can’t find them anywhere else and so you are paying for the uniqueness and supporting some uber talented artists.
Joann.com
Most of us know about Joann stores and if you are into any type of crafting or sewing probably frequently shop there, but when I discovered that you can buy fabric online from Joann.com I was so excited! And I was really surprised at the modern home decor fabrics that they have available! There is nothing better than NOT dragging my 2 crazy kiddos to the fabric store and NOT waiting in line behind 20 quilters each having 20 different fabrics cut right? (Nothing against quilters, they are just getting their creative on too.)
Joann.com has a great selection of home decor fabrics too and they are on sale frequently along with some basic use fabrics in all sorts of fun patterns. Joann is my go to for any DIY baby gift that I may be working on because their selection is huge and their coupons are so easy to find which really helps keep cost down.
WEEK 4
I’m not going to lie I haven’t really done anything with making blankets or even learning new things about them this week. I know I’m even posting this later than I should be, but I have had a beyond crazy week. But last week end I had started to make one of those knit tie blankets, but it actually ended up being a pillow. Which I’m not sure how it went from me planning on making a blanket to it slowly looking like a pillow. I can’t put a picture of it from my home computer but you’re not missing out on anything because it looks very bad.
I was hoping in the next few days to start learning things about a sewing machine. I don’t have to buy one because apparently my mom already had one in one of our spare rooms. I’m sure learning how to sew a blanket or just about anything will take a lot of time and practice. Since I will be spending these next few weeks at home hopefully I can learn plenty of things on how to use a sewing machine. I looked online a bit just to find some tips about using the sewing machine and this is what I found:
Sewing Tip #1. Say: “Cheese!”
Snap some shoot to existing threading, just to be sure you’ll be able to re-thread when you’ll need to (and you’ll need it soon, promise!)
Sewing Tip #2. Leave the thread guide up
This is an important tip! When you start sewing, the thread guide right above the needle have to be in its higher position.
Sewing Tip #3. Start by Hand
To be sure everything is perfect while you start, always do the first 1-2 stitches turning your hand wheel anticlockwise, so you can check if the needle is getting smoothly in the fabric, see if your fabric’s thickness is a problem (think hemming your jeans!), and avoid thread jams, plus, you’ll accurately define the first stitch placement.
Sewing Tip #4. Keep it down!
Never stop with your needle up, out of the fabric,while sewing a corner or when you need to slightly move the fabric (such as in a curved seam) or to pull out a pin.
Leaving the needle down and pivoting in the fabric, will help you to achieve a perfectly aligned seam.
Sewing Tip #5. When things goes bad, rethread
This is a rule, whenever you find in your seam a thread too tight or too loose, or your machine is skipping stitches, try rethreading everything, spool and bobbin (also if you think it’s all perfect!) – 99% of the times you’ll solve your problems!
- To help yourself, keep the pics you took in Tip 1 on your phone or tablet, ready to check!
While you’re repositioning the bobbin, check for lint/bird’s nest right below the needle plate… this is often what causes thread wonkyness or missing stitches!
Sewing Tip #6. Check needle type and conditions
While an Universal needle can be perfect for starting (a n° 90-14 will be the right choice), with special kinds of fabric you’ll better choose the proper needle:
- lightweight fabrics (like sheers or thin cottons) want a smaller needle (n° 60-8 or 70-9)
- with thicker fabrics like denim, better use a bigger needle (like 100 or 110!)
- to hem with a coverlock look (if you don’t know what it is, simply look at your double row t-shirt hem!), a twin needle will be your best friend
- The most important kind of needles, for me, is the knit/stretch/jersey one: we call them ballpoint needles because they have a rounded tip that goes between knitted threads, separating them; if you use a Universal needle, chances are that you’ll end with unwanted holes in no-time… believe me or not!
Sewing Tip #7. Check thread type
A rule of thumb is to use the same thread type in both bobbin and spool (unless you need to use embroidery thread, that will go only in your spool).
There’s no problem using different colors in your upper and lower thread (and it’s nice when you are topstitching a lined dress, to match both outer and inner fabric’s color with thread), but choose them from the same family (no polyester spool and cotton in the bobbin…) to avoid thread jams or breakages.
Sewing Tip #8. Clean her!
This sewing tip is a rule for your sewing machine health and longevity: try using an air duster or, better, a compressor to blow out any tiny thread or lint, hidden inside your sewing machine.
Check your sewing machine’s manual to see if you can unscrew something to clean your machine more in-depth and if you have to oil it and where.
Check this FREE Craftsy lesson or this one to learn more!
Sewing Tip #9. How to sew a straight line
The trick is: never look at your needle! Being steadily in movement, can’t be a focal point for your eyes, it would be confusing!
Measure your seam allowances distance from the needle and (if your needle plate is missing those tiny parallel etched straight lines) mark the one you need on the needle plate somehow (an elastic band, Washi tape, painter’s mask tape, sticky notes are all perfect candidates!), creating a repositionable seam guide.
Try now to keep your fabric’s edge aligned to your improvised seam guide, then admire your straight seam!
Sewing Tip #10. Try on scraps first
When you cut out your pattern pieces, never throw away your fabric’s scraps, but keep them for practicing (and calibrating) your stitchings!
From left to right you can see I’ve adjusted stitch length and width to have a perfect decorative stitch!
Here’s the website I used to get my tips from, hopefully they help me out some!
https://sergerpepper.com/2014/02/top-beginners-sewing-tips.html
WEEK 3
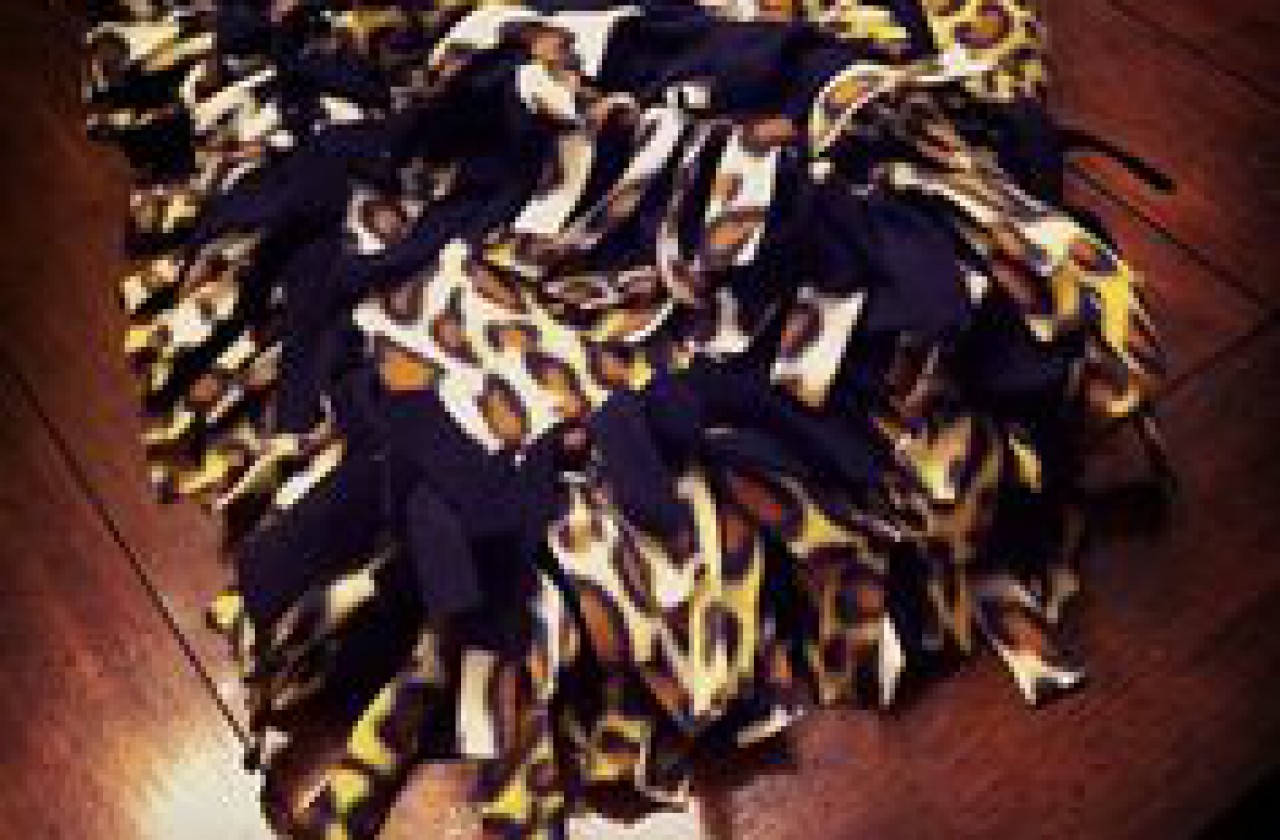
I have decided to make a fleece tie blanket for my first project. I decided to make this kind of blanket because i do not know how to use the sewing machine yet, so I improvised to make something that would not involve that.
Most fleece fabric comes 54 inches wide – your fabric should be at least 40 inches wide. The no sew fleece blanket can be sized in proportion to your recipient. For the big and tall, just make it a little larger. Here are some guidelines on how much fabric to purchase for your no sew tie blanket:
- A baby or toddler – 1 to 1 1/2 yards of both fabrics
- A child – 1 3/4 yards of both fabrics
- An adult – 2 yards of both fabrics
Supplies:
- Two pieces of outerwear fleece of the same dimensions. Each fabric piece may be a solid or a print, the same pattern or different patterns.
- Scissors
- Tape Measure or Ruler
- 5″ x 5″ piece of paper for a cutting guide
Directions:
- Cut your fabric to the desired size.
- Place one piece on top of the other lining up the edges. One piece will be the top and the other piece will be the bottom of your blanket.
- Using your 5” x 5” paper guide, cut a square from each corner of the fabric, cutting through both layers of fleece.
- To make the fringe, cut 5-inch deep slits at 1-inch intervals around all sides, cutting through both layers of fleece.
- Using an overhand knot, tie one top and one bottom fringe together – tying every other fringe around the entire blanket.
- Flip the blanket over and tie the remaining fringe together continuing around the edges until all fringe has been knotted.
Some Tips I found Online:
- Tying double knots will assure your blanket does not come apart in the wash.
- Pin the fabric pieces together to keep the fabric from shifting as you cut the fringe.
- Using different types of knots will create different effects.
- To care for your blanket, simply machine wash.
Here is the link of where i got my information from:
http://www.giftypedia.com/No_Sew_Fleece_Blanket
This is what a no tie fleece blanket looks like:

Post #1- Declarative Statement
I am in Mrs. Rathgebers English 4 class, and we have to do a 20 time project and I am going to learn how to make blankets. As a kid a lot of the blankets i had and used the most are ones my mother made for me. Since i have a child on the way i wanted to learn how to make blankets just as my mom did for me. Over the next twelve weeks I will try and learn how to make blankets with for my child. I will also try and make blankets for the rest of my family and hopefully get good enough to donate some to charity. I chose to make blankets for my 20 time project because it is something my mom used to do for me and my siblings. I think it is important for me to learn how to make blankets so that i can be doing for my child what my mother did for me. It is also important to me because me and my mom do not do very many things together. Learning how to make blankets would be a great way for us to bond and spend time together. Hopefully by the end of my twelve weeks i will have made at least a few blankets good enough for my family and to make my mom proud.
Inquiry Questions:
1. How much will the fabric cost?
2. How much fabric will it take to make 1 blanket?
3. Will i have to use the sewing machine to make these blankets?
4. How much will the doctor bill cost if i hurt myself using the sewing machine?
5. What brand of fabric is the best?
6. What stores sell fabric for the cheapest price?
7. How many different types of blankets can i make in twelve weeks?
8. What are some places i can donate these blankets to?
9. What kind of equipment other than a sewing machine will i need?
10. How hard would it be to monogram my own blankets?
